A 5.1 channel home theater system transforms a living room into a mini cinema, delivering immersive audio that makes movies, sports, and gaming feel visceral. Unlike stereo speakers that push sound from two directions, a 5.1 setup surrounds the listener with distinct audio channels, placing them inside the action. Setting one up isn’t complicated, but it requires deliberate planning, speaker placement, room acoustics, and equipment compatibility all matter. This guide walks through what a 5.1 system includes, how it works, and how to install it correctly without wasting money on mismatched components or poor positioning.
Table of Contents
ToggleKey Takeaways
- A 5.1 channel home theater system uses five main speakers plus a subwoofer to place listeners inside the action with distinct audio channels for dialogue, ambient sound, directional effects, and immersive bass.
- Proper speaker placement—front speakers at ear level angled inward, center channel above or below the TV, and surrounds elevated 1–2 feet to the sides—is essential for a convincing soundstage and dialogue clarity.
- Set the subwoofer crossover to 80 Hz for bookshelf speakers or 60 Hz for larger tower speakers to ensure bass frequencies blend seamlessly without overwhelming the main speakers.
- Room acoustics, including ceiling height, wall materials, and furniture placement, directly affect sound quality, so add area rugs, curtains, or acoustic panels to control echoes and reflections.
- Use a receiver’s auto-calibration tool first, then fine-tune speaker levels and angles manually with test tones and familiar movie scenes to achieve balanced, immersive playback.
- Match speaker polarity (red to red, black to black) and verify all connections before permanent installation to avoid phase cancellation that makes dialogue sound thin and bass disappear.
What Is a 5.1 Channel Home Theater System?
A 5.1 channel system consists of six separate audio outputs: five full-range speakers and one subwoofer. The “5” refers to the five main speakers, left front, center, right front, left surround, and right surround. The “.1” is the subwoofer, which handles low-frequency effects (LFE) like explosions, bass drops, and rumbling thunder.
Each speaker plays a distinct audio track encoded into the source material. The center channel carries dialogue, keeping voices anchored to the screen. Front left and right speakers handle stereo music, ambient sound, and directional effects. Surround speakers create depth, placing sounds behind and beside the listener. The subwoofer adds punch without needing to reproduce mid or high frequencies.
This configuration became the home theater standard in the late 1990s with the rise of DVDs encoded in Dolby Digital and DTS. Modern streaming platforms, Blu-rays, and gaming consoles still prioritize 5.1 audio, making it the most widely supported surround format. It delivers a true cinematic experience without the complexity or cost of 7.1 or Atmos systems.
Most 5.1 systems come as either home-theater-in-a-box (HTIB) packages or component setups. HTIB kits include all speakers, a receiver, and sometimes cables in one purchase. Component systems let users mix and match receivers, speakers, and subs for better sound quality and future upgrades. HTIB works well for apartments or casual setups, but dedicated components offer more headroom and flexibility.
How a 5.1 Surround Sound Setup Works
The AV receiver is the brain of a 5.1 system. It decodes surround sound formats (Dolby Digital, DTS, Dolby TrueHD, DTS-HD Master Audio) from the source and routes audio to each speaker. The receiver also amplifies the signal, so it needs enough power, measured in watts per channel, to drive all five speakers and the subwoofer without distortion.
Source devices (streaming boxes, Blu-ray players, game consoles, cable boxes) connect to the receiver via HDMI. HDMI carries both video and multichannel audio in a single cable, simplifying wiring. Older gear might use optical (TOSLINK) or coaxial digital audio cables, but HDMI supports higher-resolution formats and newer features like ARC (Audio Return Channel) and eARC (enhanced ARC), which send TV audio back to the receiver without extra cables.
The receiver assigns each decoded audio channel to the correct speaker. For example, when a helicopter flies overhead in a movie, the front speakers handle the initial sound, surrounds pick it up as it passes, and the subwoofer adds rotor thump. If the source isn’t encoded in 5.1, the receiver can upmix stereo audio into simulated surround using DSP (digital signal processing) modes like Dolby Surround or DTS Neural:X.
Understanding the Speaker Configuration
Front left and right speakers should be full-range or bookshelf models capable of handling midrange and treble. Many setups use tower speakers here for better bass extension, but that’s optional if the subwoofer is strong.
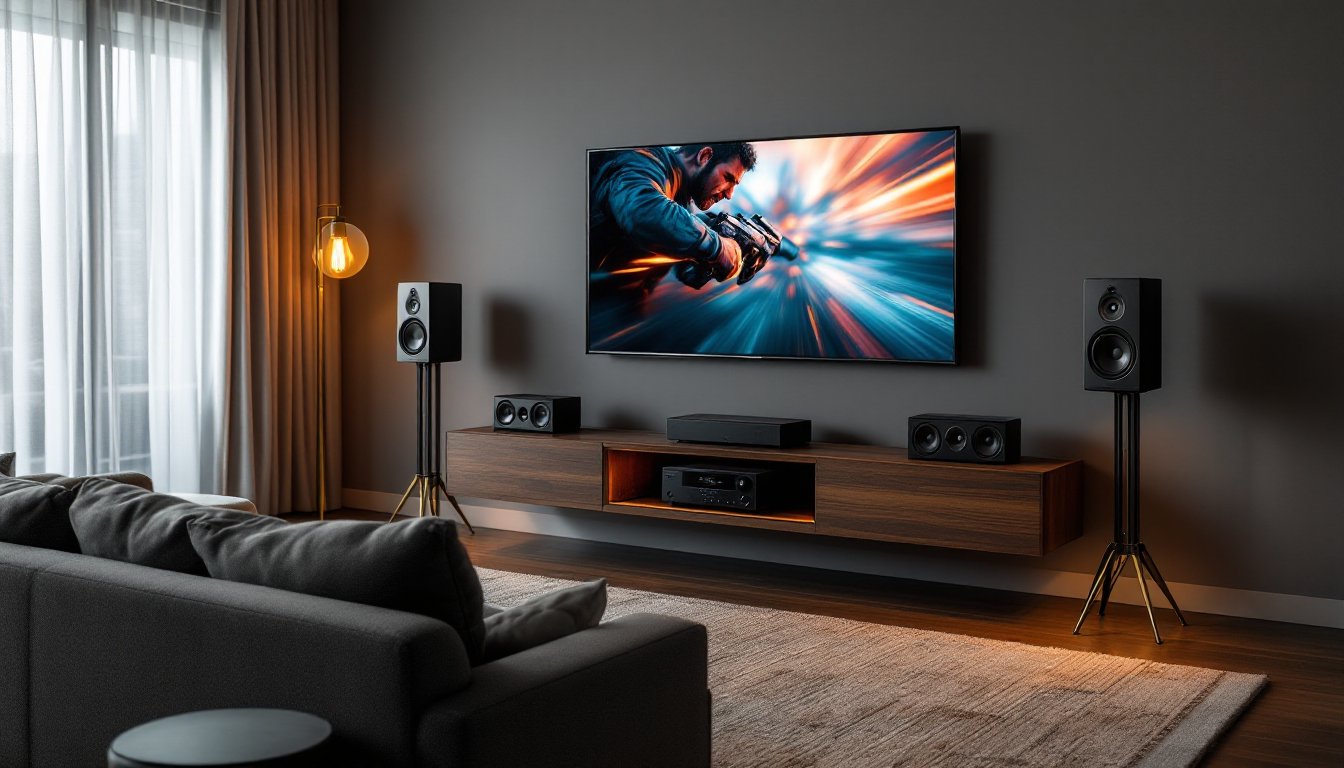
Center channel speaker sits above or below the TV, aimed at ear level. It handles the majority of dialogue, so clarity matters more than volume. A horizontal three-way design is common, two woofers flanking a tweeter, but a vertical bookshelf can work if space is tight.
Surround speakers can be dipole, bipole, or direct-radiating types. Dipoles and bipoles spread sound in multiple directions, creating diffuse ambiance. Direct-radiating speakers (like standard bookshelves) provide more precise placement effects. For most rooms under 300 square feet, direct-radiating surrounds work fine.
Subwoofer should be powered (active), meaning it has a built-in amplifier. Passive subs require external amps and rarely deliver enough output for home theater. Look for at least a 10-inch driver and a sealed or ported enclosure. Ported subs go louder and deeper: sealed subs offer tighter, more controlled bass. Placement affects output, corner loading boosts volume but can cause boominess.
Speaker wire gauge matters for longer runs. Use 16 AWG for runs up to 50 feet, 14 AWG for 50–80 feet. Thinner wire increases resistance and can reduce power delivery, especially at higher volumes.
Choosing the Right 5.1 System for Your Space
Room size dictates speaker power and subwoofer capacity. A 150-square-foot bedroom needs less output than a 400-square-foot open-concept living room. For spaces under 200 square feet, a receiver rated at 75–100 watts per channel and an 8- or 10-inch sub suffice. Larger rooms benefit from 100+ watts per channel and a 12-inch or dual-sub setup.
Ceiling height and wall materials affect acoustics. Rooms with high ceilings or hard surfaces (tile, hardwood, drywall) create echoes and reflections. Adding area rugs, curtains, or acoustic panels tames harsh frequencies. Carpeted rooms with furniture absorb sound naturally and need less treatment.
Wired vs. wireless matters for surrounds. Wired connections deliver zero latency and better reliability, but running speaker wire across a room can be a hassle. Wireless surround kits use a transmitter plugged into the receiver and battery-powered or wall-powered speakers. They work well when fishing wire through walls isn’t an option, but they cost more and add another device to charge or plug in.
Budget influences component quality. Entry-level home theater systems start around $300–$500 for an HTIB with decent output. Mid-tier component systems run $800–$1,500, offering better build quality, more inputs, and room correction software like Audyssey or YPAO. High-end separates (pre-amp and power amp instead of a receiver) cost $2,000+ and suit dedicated theater rooms.
Receiver features to prioritize: HDMI 2.1 inputs for 4K/120Hz gaming and eARC support, auto-calibration (uses a microphone to measure room acoustics and adjust speaker levels), streaming integration (Spotify, AirPlay, Chromecast), and enough HDMI inputs for all source devices. Don’t overpay for Atmos or DTS:X decoding unless you plan to upgrade to ceiling speakers later.
Speaker matching matters. Ideally, all five main speakers should come from the same product line, same tweeter design, same crossover tuning. Mismatched speakers create tonal shifts as sound moves across channels. If mixing brands, at least match the center with the front left/right for consistent dialogue.
Planning Your Home Theater Room Layout
Start with the primary seating position, the “sweet spot” where the listener sits centered between all speakers. Measure the distance from the screen to the couch: this becomes the reference point for speaker angles and distances.
Front speakers should form an equilateral triangle with the listener. If the couch is 10 feet from the TV, space the left and right speakers roughly 10 feet apart, angled inward (toed in) about 22–30 degrees. This focuses the stereo image and improves dialogue clarity from the center channel.
The center channel goes directly above or below the TV, aimed at seated ear height (typically 36–42 inches off the floor). If it sits on a console below the screen, tilt it upward using rubber wedges or small blocks. If wall-mounted above the TV, angle it down. Never place the center inside a cabinet or behind the TV stand, fabric grilles don’t prevent muffled sound.
Subwoofer placement isn’t as strict because bass frequencies are non-directional below 80 Hz. Common spots: front corner (loudest but risks boominess), midpoint along the front wall (balanced), or the “subwoofer crawl” method, place the sub at the listening position, play bass-heavy content, and walk the room’s perimeter. Where bass sounds best to your ears, place the sub there.
Optimal Speaker Placement for Maximum Impact
Surround speakers belong to the sides or slightly behind the listener, elevated 1–2 feet above seated ear level. The ITU (International Telecommunication Union) standard recommends placing surrounds at 90–110 degrees from the center axis. In practical terms: if you’re sitting facing the TV at 0 degrees, surrounds should be at roughly 10 and 2 o’clock, not directly behind you.
Wall-mounting surrounds works well for permanent setups. Use tilt/swivel brackets to aim drivers toward the seating area. For temporary or rental situations, speaker stands keep things flexible. Stands should be stable, fill hollow bases with sand or lead shot to reduce vibration.
Avoid placing any speaker in a corner unless it’s the subwoofer. Corners amplify bass and create muddy midrange. Keep front and surround speakers at least 6 inches from walls to allow rear ports to breathe (if they’re ported designs).
Cable management matters. Run speaker wire along baseboards, under area rugs, or through wall cavities using CL2- or CL3-rated in-wall cable if fishing wire through studs. Use cable raceways or cord covers for exposed runs. Label each wire at both ends, receiver terminals are clearly marked (L, C, R, SL, SR, SW), and mixing up connections ruins the soundstage.
For rooms where symmetry isn’t possible, furniture blocking a surround, open doorway on one side, most receivers offer channel delay and level adjustments. The auto-calibration mic measures distances and compensates for imbalances, but manual tweaking using a sound meter app and test tones yields better results.
Installation Tips and Common Mistakes to Avoid
Run all cables before placing speakers permanently. Measure twice, cut once. Speaker wire should have 6–12 inches of slack at each connection for future adjustments. Strip wire ends cleanly with wire strippers, don’t use teeth or scissors. Twist stranded wire tightly and insert into spring clips or binding posts without stray strands touching adjacent terminals (this causes shorts).
Match polarity. Every speaker has positive (+) and negative (−) terminals, usually marked with red and black. Connect the red receiver terminal to the red speaker terminal, black to black. Reversing polarity on one speaker causes phase cancellation, where bass disappears and the soundstage feels hollow. If voices sound thin after setup, check polarity.
Calibrate using the receiver’s auto-setup routine first, then fine-tune manually. Place the included calibration microphone at seated ear height in the primary listening position. Run the test tones: the receiver adjusts speaker levels, crossover points, and distances. Afterward, play familiar movie scenes and adjust individual channel levels (usually via the receiver’s remote) until dialogue feels centered and effects feel immersive.
Set the crossover correctly. This determines which frequencies go to the main speakers vs. the subwoofer. Most bookshelf or satellite speakers can’t reproduce bass below 80 Hz cleanly, so set the crossover to 80 Hz. Larger tower speakers with 6-inch or bigger woofers can handle 60 Hz. The subwoofer picks up everything below the crossover, relieving the mains of bass duties.
Common mistakes: placing surrounds too high (above 3 feet from ear level loses immersion), setting volume too loud during calibration (causes clipping and blown tweeters), ignoring room acoustics (hard surfaces reflect sound and muddy dialogue), and skipping firmware updates on the receiver (newer codecs and HDMI handshake fixes often come via updates).
Don’t daisy-chain power strips or plug the subwoofer into the same circuit as power tools or appliances. Subwoofers draw significant current, and sharing circuits causes hum or tripped breakers. If you hear a low-frequency hum through the sub, check for ground loops, unplug the cable box or other HDMI devices one by one to isolate the culprit, then use a ground loop isolator.
Test with known reference material. Blu-rays of Mad Max: Fury Road, Blade Runner 2049, or Dunkirk showcase 5.1 mixes engineered for home theater. Listen for discrete surround effects, cars passing side to side, rain spattering around the room, dialogue locked to the center. Streaming services compress audio more than physical media, so don’t judge system performance solely on Netflix streams.
For renters or those avoiding wall mounts, quality speaker stands cost $50–$150 per pair and offer vibration isolation and cable routing. Brands like Sanus, WALI, or Monoprice make adjustable stands that fit most bookshelf speakers. Pair with foam isolation pads or sorbothane feet to decouple speakers from stands and reduce resonance.
Finally, many of the best surround sound systems include room correction software that handles most heavy lifting, but critical listening and manual tweaks still matter. If something sounds off, boomy bass, harsh treble, muffled dialogue, adjust one variable at a time: speaker angle, crossover, or EQ settings. Small changes yield big improvements.
Once dialed in, a 5.1 system delivers a level of immersion that soundbars and stereo setups can’t match. Whether it’s the roar of a jet engine sweeping overhead or the subtle rustle of leaves in a quiet scene, discrete channels place every sound exactly where the mix engineer intended. With careful planning and attention to placement, even a modest system in a typical living room can rival the experience of premium theater configurations found in dedicated media rooms.